Login
EPIC Hosting. EPIC Support.
Menu
  • Home
  • Hosting
    • Shared Hosting Start your engines.
      Reseller Hosting Bang for buck. For miles.
      Cloud/VPS Hosting Feel the need. For speed.

      Starting at $4.49/mo

      Experience why people have loved us for over 20 years!

      Get started today!

  • Services
  • About Us
  • Contact
  • Account
    • Dashboard
    • My Domains
    • My Services
    • My Profile

Category Archives:
Account Security Archives - HostDango.com

Home / Blog / Account Security

Force HTTPS Redirect Automatically Using cPanel’s File Manager

  • 08 August 2018
  • by: hostdango
  • in: Account Security,Hosting,How-To
  • note: no comments

With security being such an important piece of everything we do online, it’s important for you, and your site visitors, to feel safe when they are visiting your site, whether the goal is to purchase something or, simply, read a blog post.  With this post, I’ll lay out a quick how-to which will demonstrate how to force HTTPS redirect automatically using cPanel.

HostDango.com provides Linux hosting on operating systems such as CentOS, which uses a file called .htaccess to handle redirection on a per-account basis.  Since accounts aren’t provisioned with an .htaccess file by default, I’ll also go over how to create one, using cPanel’s built-in File Manager.

Accessing the File Manager

In order to force HTTPS redirect automatically, there are a few steps you need to take.  First things first.  You can edit your files directly from your web browser, without having to upload them via S/FTP.  In order to access your File Manager, you need to first log in to your cPanel account.  Once logged in, click Files -> File Manager.  The File Manager is a graphical tool for managing your files, much like Windows Explorer.  As you’ll see, the File Manager is easy to use and very intuitive.
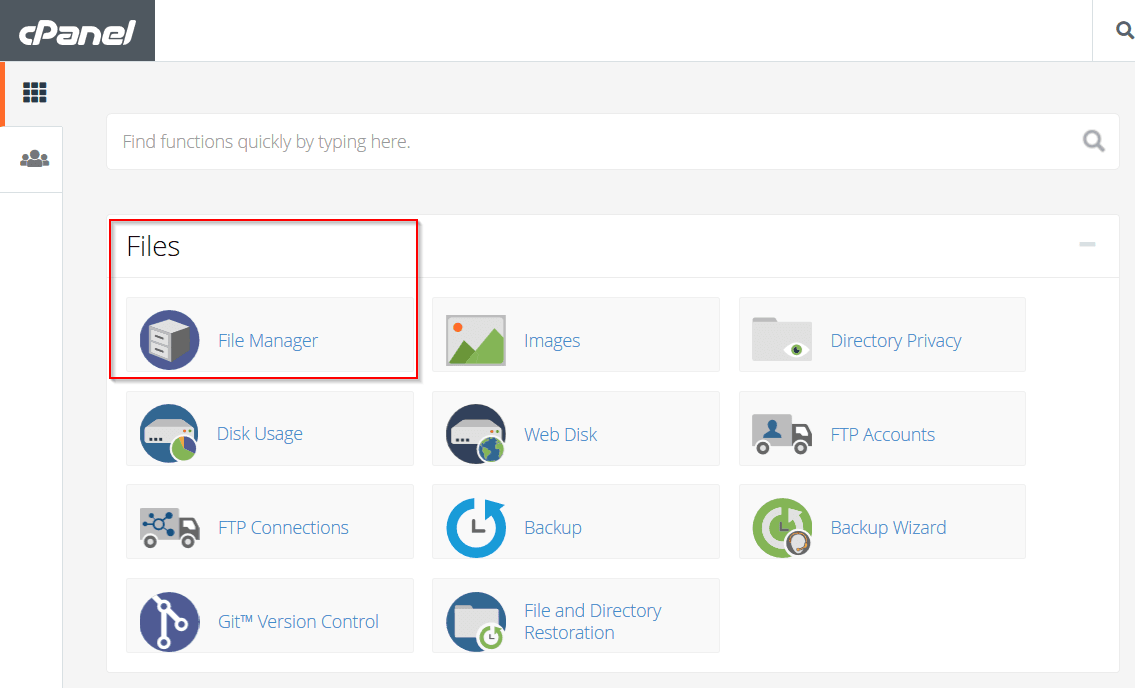
Force HTTPS redirect automatically using cPanel's built-in File Manager

Once you’ve managed to navigate into your File Manager, you’ll need to make sure you can see hidden files.  Because the .htaccess file is hidden by default, we’ll want to be sure to turn this option on (this is why we see the dot in front of ‘htaccess’).  The steps to accomplish this are quite simple.  In the upper-right corner of your screen, click SETTINGS, and in the dialogue box that appears in the center of the screen, tick the box for “Show Hidden Files (dotfiles)”.  It’s literally that easy.
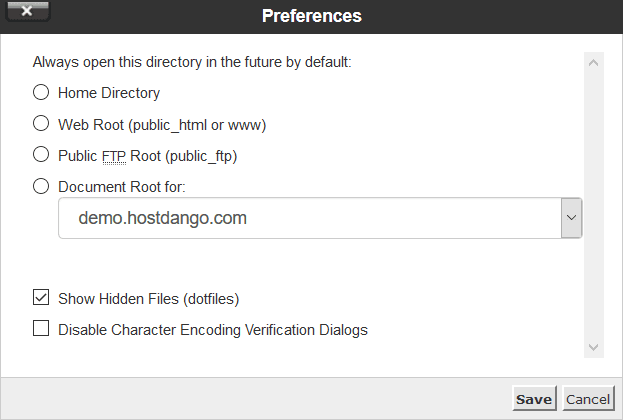
Force HTTPS redirect automatically using cPanel's built-in File Manager

Now, on the left column (in the image below), expand home -> public_html.  When you do this, you should see your files in that directory appear in the right column.  One of them may, or may not, be your .htaccess file!  Don’t worry if you don’t see it in the right column!  Creating the file itself in the File Manager is very easy and I’ll show you how in the next section.
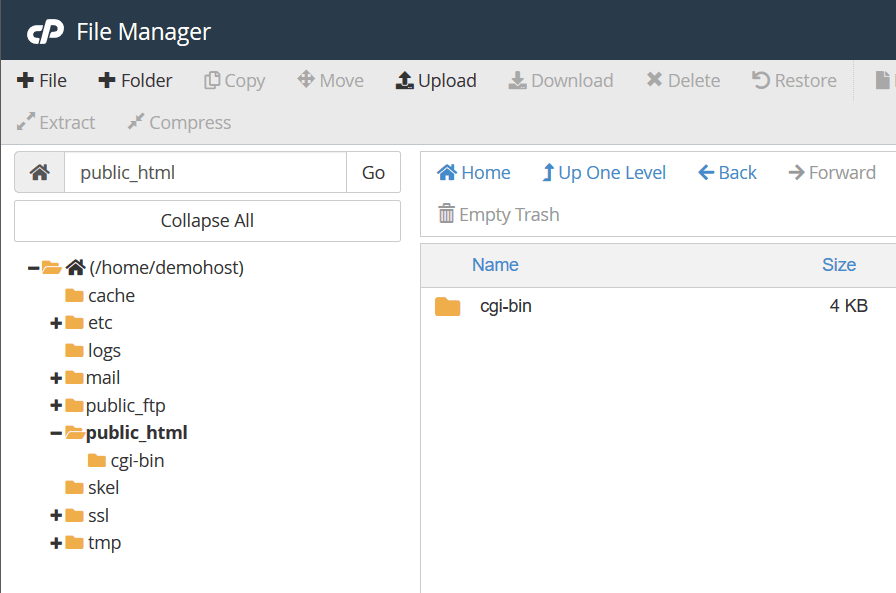
Force HTTPS redirect automatically using cPanel's built-in File Manager

Creating the File

If you don’t see an .htaccess file, like in the image above, we’ll create one here.  To create an .htaccess file in your File Manager, click “+File” in the upper-left corner.  As a result, you’ll be presented with a dialogue box to name the file and select the folder you wish it to go into. Simply name it .htaccess and leave the default /public_html box alone.
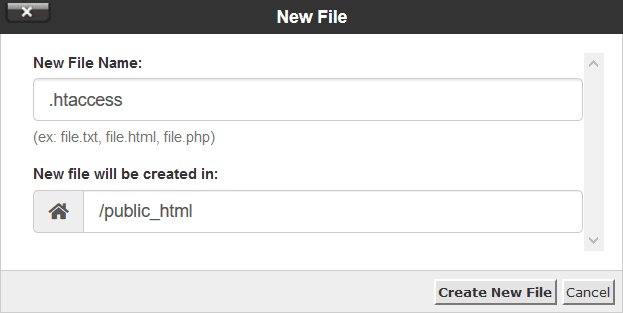
Force HTTPS redirect automatically using cPanel's built-in File Manager

I need to put an emphasis here on the fact that that you should leave the path /public_html if your web site lives in public_html.  The proper placement for the .htaccess file is in the root of your web site.  If your web site lives in /public_html/web, that would be the place to place your .htaccess file. Because we created the file in public_html, this is where we defaulted to for the path in the image above.  You can click the home icon to change the path, or you can edit it manually by typing in a path.

Since we now know we can actually see the .htaccess file, you can click it with your mouse.  When you click the file name, it should highlight to a different color (light blue in this case).  You can click the Edit button above the list of files, as seen in this image:
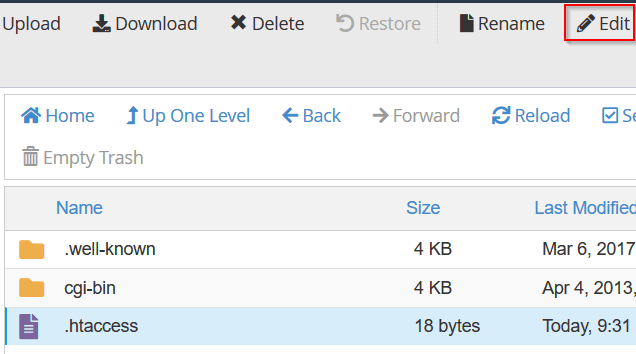
Force HTTPS redirect automatically using cPanel's built-in File Manager

Force HTTPS Redirect Automatically

Once you’ve got the file open (it will open into a new browser tab or a new browser window, depending on your settings), your next step is to insert the actual code to perform the redirect.  You can literally copy and paste this code to your .htaccess file:
RewriteEngine On
RewriteCond %{HTTPS} !on
RewriteCond %{REQUEST_URI} !^/[0-9]+\..+\.cpaneldcv$
RewriteCond %{REQUEST_URI} !^/\.well-known/pki-validation/[A-F0-9]{32}\.txt(?:\ Comodo\ DCV)?$
RewriteRule (.*) https://%{HTTP_HOST}%{REQUEST_URI}

Of course, there are other ways to do this as well, if you’re using WordPress.  If you’re not using a WordPress site, this will definitely do the job!

The end result?  You’ve managed to force HTTPS redirect automatically for all of your web traffic!  We would like to hear if you’ve got a different way that you prefer to do this!  If you have questions for us, please drop us a line!

Enable Two-Factor Authentication for Client Area

  • 28 March 2018
  • by: hostdango
  • in: Account Security,How-To
  • note: no comments

Introduction

Security.  What a thing this has become, hasn’t it? Did you know you can secure your billing and support account so that the only way to access it is by holding your mobile device in your hand? This type of secondary authentication method is known as two-factor authentication.  Two-factor authentication (2FA) is something we offer so there’s that extra layer of security between your data and someone whom you might not want to have access to it.  I’ll lay out a quick how-to so that you can enable 2FA for your billing and support (Client Center) account.

Prerequisits

In order to enable 2-factor authentication in cPanel, you’ll need just a few things:

  • A smart phone with a time-based one-time password (TOTP) app. We recommend the following:
    • Android: Authy, or Google Authenticator
    • iOS: Duo Mobile
    • Windows Phone: Authenticator
  • Access to your Client Area account

Enable Two-Factor Authentication

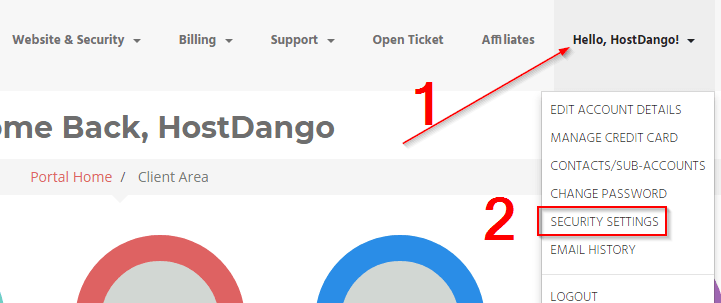
First off, log into the Client Area.  Click your name in the upper-right corner and select “SECURITY”:

Begin the process of setting up two-factor authentication


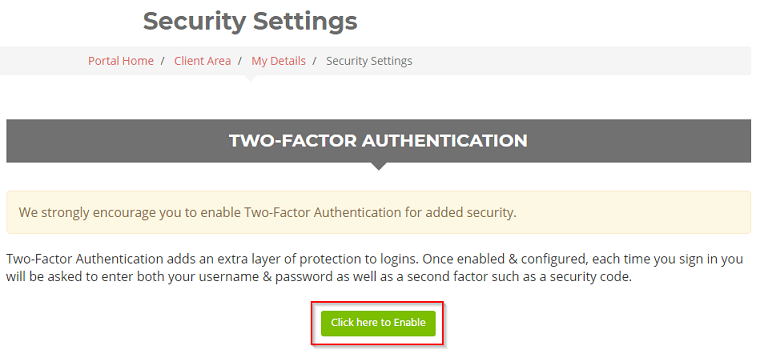
Next, simply click “Click here to Enable”:

Enable two-factor authentication

Two-Factor Authentication adds an extra layer of protection to logins.  Once enabled & configured, each time you sign in you will be asked to enter both your username & password as well as a second factor such as a security code.  Click “Get Started”.

On Your Mobile Device

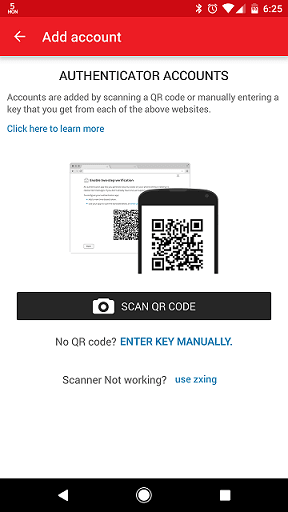
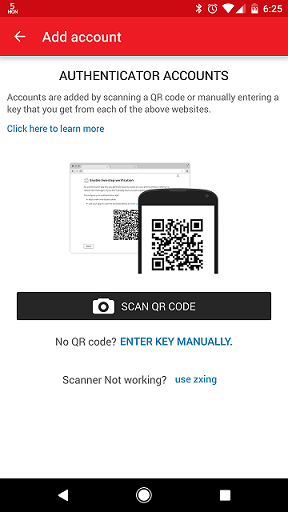
This is where you’ll need your mobile device.  Much like our post about enabling 2FA for your cPanel account, we’re going to use “Authy” for this setup.  Authy is a multi-platform application that works well for storing different 2FA keys. In Authy, to add an account, click the three dots menu link in the upper-right corner, and select ‘Add Account’.  Once you’re on that screen, tap on ‘SCAN QR CODE‘:Setup two-factor authentication in Authy

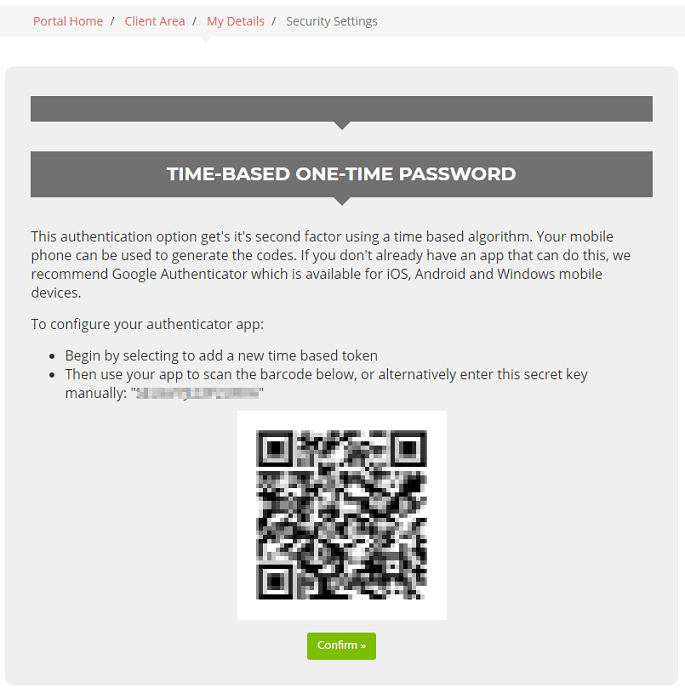
Simply aim your phone’s camera at your computer monitor and Authy will automatically capture the QR code.

Scan your two-factor authentication code using the Authy app

At this point, you will want to name the account (and change the “key” icon, if you wish to customize the icon by color, or other logo) something that will be easy to identify in the future.  Once you have named the account, click ‘DONE’.

Important

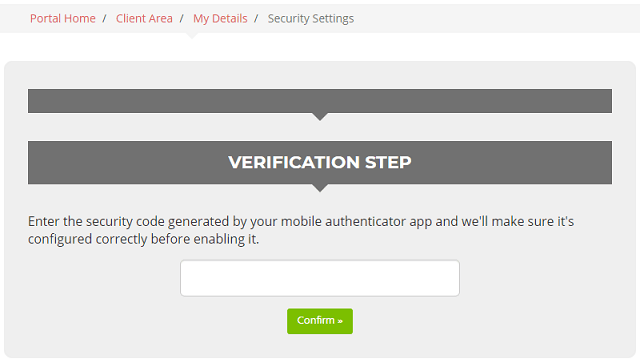
Make note of the six-digit code.  Enter that code into the ‘Verification Step’ box, as seen below, in the setup page to actually enable two-factor authentication.

Insert two-factor authentication code provided by Authy

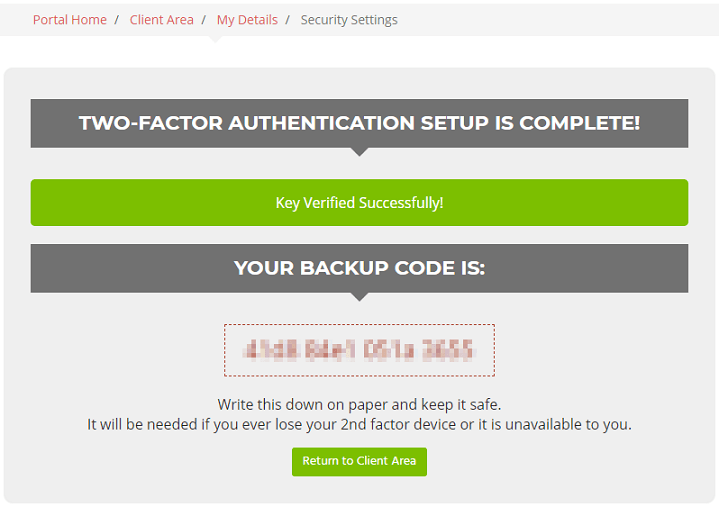
Once this is successfully completed, you will be presented with a page indicating you have successfully enabled two-factor authentication.  This page will have your backup code listed on it. Store this code somewhere safe, in case you misplace your mobile device.  You will need it to gain access to your account and set up 2FA again.

Record your two-factor authentication backup code

At this point, you are done.  The next time you log in to the Client Area, and every time after this, you will be prompted for a security code after you enter your user ID and password. If you have any issues with this process, please don’t hesitate to open a support ticket and we will happily help you with the process.

Enable Two-Factor Authentication for cPanel

  • 05 December 2016
  • by: hostdango
  • in: Account Security,How-To
  • note: no comments

Introduction

If you use cPanel, one of the best things you can do to protect yourself, and your data, is to enable two-factor authentication for cPanel.  Recently, cPanel added this feature to their software suite and we’re ecstatic to announce that we’ve enabled it across our shared hosting environment.  This quick tutorial will show you how easy it is to enable 2-factor authentication for cPanel.

Prerequisites

In order to enable 2-factor authentication in cPanel, you’ll need just a few things:

  • A smart phone with a time-based one-time password (TOTP) app. We recommend the following:
    • Android: Authy, or Google Authenticator
    • iOS: Duo Mobile
    • Windows Phone: Authenticator
  • Access to your cPanel account

Enable Two-Factor Authentication for cPanel

To enable 2-factor authentication for cPanel, you’ll need to log in and navigate to the ‘SECURITY‘ section of cPanel.  From there, click on ‘Two-Factor Authentication’.

enable two-factor authentication for cPanel
Select the Two Factor Authentication icon

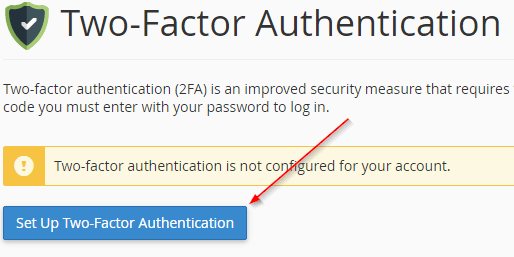
Once there, click on ‘SET UP TWO-FACTOR AUTHENTICATION’.

enable two-factor authentication for cPanel
Click the Set Up Two-Factor Authentication button


On Your Mobile Device

This is where you’ll need the assistance of your mobile device. Open the app of choice (in this case, we’re using Authy) and add an account.  In Authy, to add an account, click the three dots menu link in the upper-right corner, and select ‘Add Account’.  Once you’re on that screen, tap on ‘SCAN QR CODE‘.

enable two-factor authentication for cPanel
Open your 2FA application on your mobile device

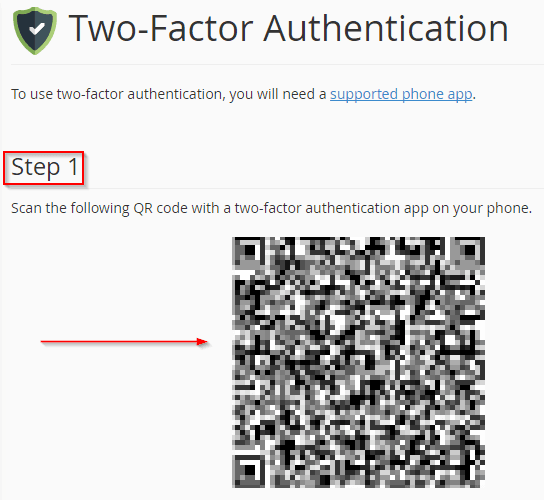
Simply aim your phone’s camera at your computer monitor and Authy will automatically capture the QR code.

enable two-factor authentication for cPanel
Scan the QR code


At this point, you will want to name the account (and change the “key” icon, if you wish to customize the icon by color, or other logo) something that will be easy to identify in the future.  Once you have named the account, click ‘DONE’.

Important

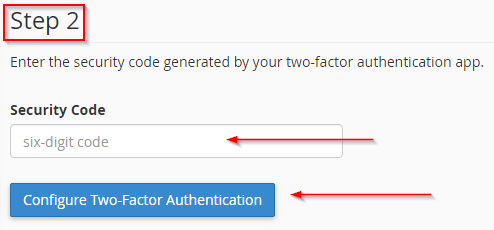
Make note of the six-digit code.  Enter that code into the ‘Security Code’ box, as seen below, in cPanel to actually enable two-factor authentication for cPanel.

enable two-factor authentication for cPanel
Copy the 6-digit code from your mobile app to the box

Once you have entered in the Security Code, click on ‘Configure Two-Factor Authentication’.  You will be presented with a message which reads:

Success: Two-factor authentication is now configured on your account.

At this point, you are done.  The next time you log in to cPanel, and every time after this, you  will be prompted for a security code after you enter your cPanel user ID and password.

enable two-factor authentication for cPanel
Enter the six-digit code into the box and click Continue

If you have any issues with this process, please don’t hesitate to open a support ticket and we will happily help you with the process.

Site Categories

  • Account Security (3)
  • Announcements (1)
  • Hosting (1)
  • How-To (4)

Recent Posts

  • Train SpamAssassin to Block SPAM!
  • Force HTTPS Redirect Automatically Using cPanel’s File Manager
  • Enable Two-Factor Authentication for Client Area
  • EPIC. Raised a Notch.
  • Enable Two-Factor Authentication for cPanel

Site Archives

  • February 2021 (1)
  • August 2018 (1)
  • March 2018 (2)
  • December 2016 (1)

Post Calendar

May 2025
M T W T F S S
 1234
567891011
12131415161718
19202122232425
262728293031  
« Feb    

Need Help? Call Us 24/7:

Sign up to Newsletter to get special offers


Hosting

  • Web Hosting
  • Reseller Hosting
  • VPS Hosting
  • Domains

Follow Us

Support

  • Product Support
  • Contact Us
  • Knowledge Base
  • Terms of Service
  • Acceptable Use Policy

Company

  • About Us
  • News / Blog


Mail: info@hostdango.com


Copyright © 2021 HostDango.com - All rights reserved.
Terms of Service | Privacy Policy | Site Map
Scroll